Tuesday 26 May 2009

Giveaway time!

A warm welcome to everyone who is visiting me today from Sew, Mama, Sew! as part of their giveaway day. (and of course welcome to everyone else who is visiting just because!) I hope you enjoy your stay and have the chance to have a quick look around my blog. I am new to the whole blogging thing - I have been following a few blogs for over a year and as my interest in sewing and quilting grew so did my blog list! I finally decided to take the plunge and start a blog partly to record my efforts but also to get involved with things like this - everyone is so generous with their time and creativity that I wanted to return some of what I have been enjoying. So onto my giveaway! I decided that although I am still a novice when it comes to sewing I wanted to have a go making something for you, albeit something simple. I know that what I have created won't compare to some of the amazing things out there on offer but hopefully my efforts will be able to find a new home somewhere!

My first giveaway is for these two raggedy hearts. They were lots of fun to make and pretty straightforward too. I have written a tutorial in case you would like to have a go making a raggedy heart of your own.


My second giveaway is for a little taggie blanket. I made one for my six month old baby boy and he adores it - there is just something about babies and ribbons that seem to go together!


If you would like to be entered into one or indeed both giveaways please leave a comment. I look forward to visiting your blogs and hopefully discovering some more lovely craftiness out there. Thanks for visiting and good luck!

Monday 25 May 2009

sometimes it's not just bills in the post!

An exciting packet arrived for me....


Look what I got! Lots and lots of lovely fabric thanks to r0ssie and her Flickr group, take charge, DISCHARGE! give it a try, OVERDYE!


There are some great pictures of peoples experiments and joining the group has opened up a whole new world of possibilities. Here was my bleach experiment:


To start things off she organised a fabric giveaway and I was lucky enough to win one of three wonderful fabric bundles. Isn't that a fabulous pile of pretty fabrics? r0ssie is so generous and I am very happy!


I really fancy trying overdying next with the two pieces of red fabric r0ssie sent. As for the rest, well that is going to be used in a quilt for a little girls birthday.

raggedy heart tutorial


Here is a tutorial to make a simple raggedy edged heart. As this is my first time writing a tutorial please let me know if you spot any obvious mistakes or omissions. Also please excuse the quality of the photos - the weather in the UK was not cooperating when I made the hearts - it was being all rainy and overcast!

To make a raggedy heart you need the following:

1 Fat Quarter of fabric (or less - you can easily make two hearts with a full FQ)
A piece of thin wadding
Iron on interfacing
A piece of ribbon


1. Draw a heart shape on a piece of cardboard. Mine turned out approx 8 inches by 8 1/2 inches. Make a second heart shape template approx a quarter of an inch smaller than the first. If you would like your finished heart to have fluffier edges make your second template half an inch smaller.


2. Cut out two fabric hearts using the larger template, then one wadding heart and two interfacing hearts using the smaller template.


3. Iron each interfacing heart onto the wrong side of each fabric heart.


4. Make a sandwich by putting the wadding heart in the middle of the two fabric hearts. The right side of the fabric should be on the outside. So your sandwich should be fabric, interfacing, wadding, interfacing, fabric. As you can see from the photos my heart templates were not very even so I ended up doing a bit of trimming to make sure that there was a good quarter inch of fabric round the edge of the interfacing/wadding.


5. You should end up with something that looks like this:


6. Pin a loop of ribbon to the top of the heart, sandwiching the ends inside the heart layers.


7. Pin all round your heart ready for sewing.


8. Sew round your heart using a quarter inch seam. (or half an inch if you are going for the super fluffy look)


9. Sew inside this seam to secure the wadding using whatever pattern you fancy.


10. Now for the fun bit! Using very sharp scissors, snip all the way round the outside of the heart approximately every quarter inch. Take care not to cut through the seam and into the wadding. (sorry the picture is a bit ropey - I wanted to show you a close up of the snipping)


11. They should now look like this:


12. Wash your hearts in the machine then tumble dry to fluff up the edges. I did this step twice to make them extra fluffy and crinkly. There they are - raggedy hearts done.

Friday 22 May 2009

a proud moment


I am one happy mummy today. My 5 year old son made his very first quilt! He asked if he could have a go and of course I said yes. He chose all the scraps and arranged the quilt to his own design. He pressed the machine pedal himself but had a bit of help with guiding the fabric and snipping threads. Making me even prouder is that this quilt is for grandma - he wanted to make something special for her. Finally to really make me cry he said 'thank you so much lovely mummy for helping me to sew my lovely quilt!' My first born son is wonderful! His quilt is so much fun - he really enjoyed going through my scraps and building up his quilt a piece at a time.


My second born son and very vocal six month old is also wonderful and for him I made a taggie blanket. I also made one for another six month old baby and a set of twins. These were fun to make!


I have also finished making my offerings for the giveaway day at Sew Mama Sew and have written a tutorial to go alongside. Here is a sneaky peak:

Friday 15 May 2009

Yipeeee!


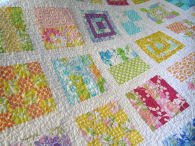
It's finally finished! Although this is my second quilt top it is the first quilt I have fully made including the basting, quilting and binding. I am very pleased with it. OK so it is wonky in places, some of the quilting is a bit dodgy and the binding a bit fuzzy round the corners but nevertheless to me it is wonderful!


The quilt is for my two boys to share - hence the crazy colour scheme. I really enjoyed all the stages you have to go through to create a quilt and especially enjoyed the binding which is a surprise as I was not looking forward to hand sewing. Although I wanted to have a go doing free motion quilting my old singer was not up to the job so I had to make do with wonky lines instead. I like this random look so am not too bothered.


All credit must go to Elizabeth at Oh, Fransson! for providing the pattern and tutorial for this quilt and for setting up the quiltalong to go with it. I have loved being part of it and watching the different quilts develop. They can all be found here and are well worth a look.
Of course I am now fired up to make another quilt... only this time even better! I so have the quilting bug. I am now off to sit on the sofa for half an hour under the quilt of course!

Wednesday 13 May 2009

Giveaway News


Sew, Mama Sew! are hosting/coordinating a giveaway. This is the first one I will have done on my blog and I am really looking forward to taking part. I have signed up with SMS so there is no backing out now! My biggest problem is deciding what to make. My first thought was to offer a couple of fat quarters but I will be brave and make something instead. I do have to admit to being daunted by the standard and general loveliness of work out there - I am not sure that my offering will be anywhere near as good! At the moment I am thinking it will be a dolls blanket and pillow but if I have the time it might be a bag of some description. Humm... I will have to put on my thinking cap.

Monday 4 May 2009

party time

Well my boys have a better social life than I do. They are always at one party or another or having playdates! However it does mean that I have been able to express my girlie side recently by making a couple of simple doll quilts and pillows for the girls birthday celebrations they have been to.


This fabric is so pretty - the little girl in question said her favourite colours were red and pink so this fits perfectly!


The back was red with white dots but I forgot to take a picture of it.


Here is my other recent effort. I like the random line quilting - I think I will do this on my big quilts. I have not had any luck yet with free motion quilting - it has always gone horribly wrong.


It is a bit wonkey but I am sure the little girl who recieved it won't mind!